
WARNING: Nerdy Engineer’s Brain at Work!
When we bought our new house last fall, we decided that the first area to remodel would be the upper floor with the two main bedrooms and bathroom. We moved into the two guest bedrooms downstairs and I went to work upstairs.
Getting Started
It always starts as a simple plan. There were really only a few things on the initial remodel list:
- Scrape the popcorn ceilings. Leslie and I both hate them!
- Paint everything. Reece’s room has a hideous sponge paint job.
- Expand a linen closet and add plumbing and electrical to move the washer and dryer upstairs.
However, after getting started with those projects we quickly added a bunch more items to the list. As long as this is a construction zone, I might as well make the entire space something that we can enjoy for many years to come, right?
Making a Plan
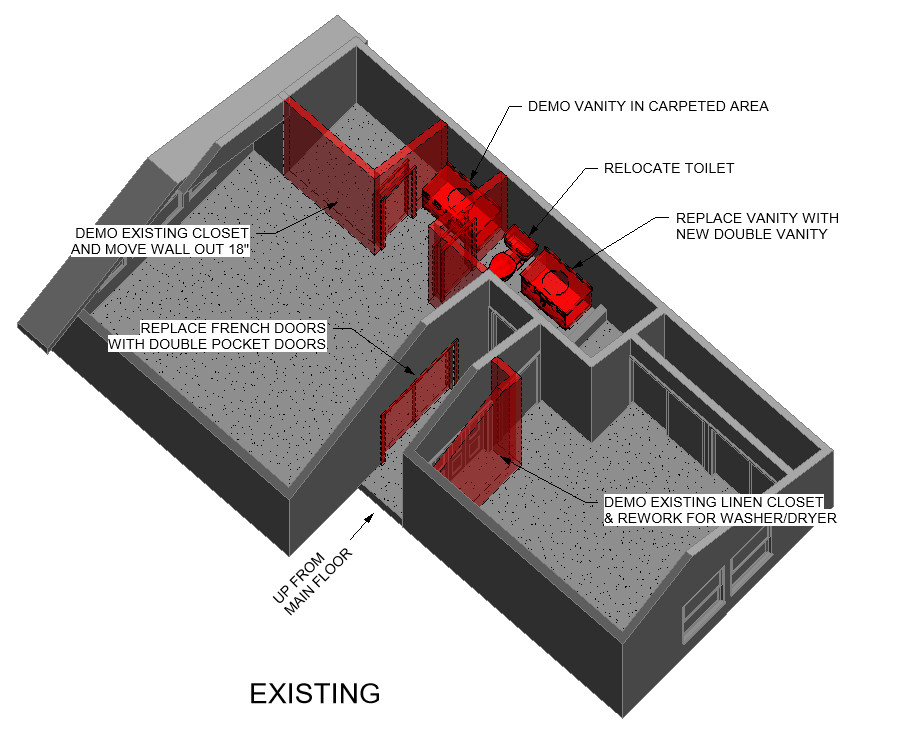
I got out my tape measure and laptop to sketch up the existing layout and some ideas for improvements. A few nights later, I had the entire upper floor 3D modeled with the “before and after” to show Leslie. What can I say? I warned you. My engineering brain took over.
Here is the new remodel list:
- Step 1: Demo linen closet
- Step 2: Demo bathroom
- Step 3: Demo master bedroom walk-in closet
- Step 4: Start over!
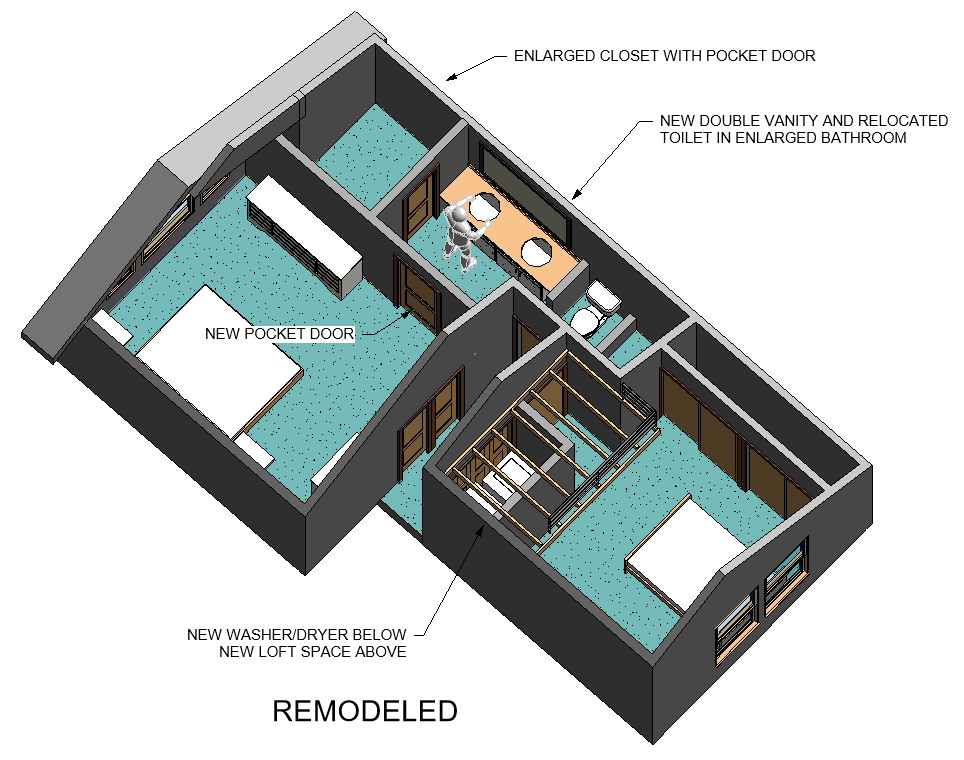
The actual list is too long to bother with. 😉 I just keep working on things as time permits. It will get done eventually. Hopefully, it will look something like this…
Why This Plan?
Why make all these changes? In a word – “functionality”. The existing layout just does not work that well. Laundry… three flights of stairs down? A bathroom vanity with carpeting right there? A walk-in closet with only two usable walls (the door opens into the other wall)? Fixtures from the 1980’s? None of it worked for me.
So what do we gain by making so many changes?
- Bathroom: Double vanity with room to move
- Bathroom: Improved lighting and ventilation
- Walk-in Closet: Three usable walls for maximum closet space
- Washer and Dryer: On the bedroom level
- Reece’s Bedroom: Huge loft space for maximum fun factor
- Modern Design
I’m excited about all the improvements that this project will make to our house. At this point, I think Leslie is just looking forward to the completion of this project, so we can start reaping the rewards!
Making it Happen
This project actually got started in early November, 2016. Things have moved along slowly, as always. I have a life outside of this home remodeling that keeps interrupting the progress! It’s coming along though. I was finally able to start the drywall this weekend, so I’m feeling like the hard work is mostly behind me. It always seems like the planning stages and behind the scenes work (framing, plumbing, HVAC, electrical) takes me forever, but I’m just about past all that now. Writing this post, isn’t helping the project move along any faster… I better get back to work!
Oh, by the way, 3D modeling is one of the things that I do for my real job. More to come…
I love reading what you are doing! Great job!
Young? I don’t feel so young any more after turning 40 last year, but I’m still trying to act as young as possible!
Wish I were young again. Looks great.
Looks great! I need a lesson, or 10, on the 3D planning
My services are always available for a small fee. 🙂