
There seems to be a lot of confusion with new 3D printer users about the basics of the software and hardware that is required to produce a 3D printed object. Let me explain…
As I mentioned in my first post, I recently purchased my first 3D printer. Actually, I “purchased” it over a year ago on Kickstarter, but I just received it about 3 months ago. This particular 3D printer is manufactured by a new startup company called Deltaprintr. Overall, I’d say it’s been a learning process so far. I’ve enjoyed it for the most part. As with any new technology though, there have been a number of challenges to sort through.
One of the things that I’ve noticed on the forums is that a lot of non-techie type people are starting to experiment with 3D printers. I think that this is a result of the entry cost dropping, and all the exposure that the 3D printing technology has received in the past couple of years. In any case, the 3D printing industry is growing rapidly now, and it can be difficult to figure out how to get started given all the hardware and software options that you can find with a simple Google search. It took me a bit of experimentation and research to get it all figured out too. Let me see if I can explain the basic process for you.
The 3D Printing Process
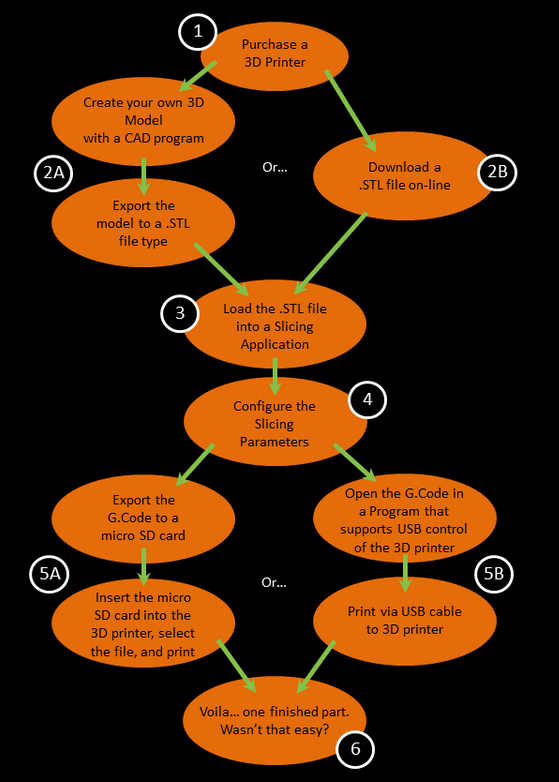
I know that parts of this process might still look foreign to you if you haven’t owned and operated a 3D printer before, so let’s look at each step a bit closer.
1. Purchase a 3D Printer
This one is pretty self-explanatory. Without a 3D printer, you won’t need to bother with most of the other steps here.
It is worth noting though that you don’t need to own a 3D printer to design your own 3D creations. If you are interested in just the 3D modeling a part, or you only need a couple of things printed, then you could certainly still do your own 3D modeling design. You could then upload your model to one of the on-line 3D printing services and have them print your part and ship it to you. Shapeways is probably the most notable of these services. Even if you have your own 3D printer, you might consider utilizing one of these services to print a higher quality part or to print your part in a different material after you’ve finished prototyping it. You can even get things “printed” in metal, ceramic, or flexible materials.
There are so many companies manufacturing 3D printers now, that I’m not even going to discuss how to pick which printer you want. Not only are there many companies, but there are also a number of different technologies available now. 3D printers also range from custom-built, to assembling a box of parts, to ready-to-go shiny new printers straight out of the box. There is too much to cover in terms of printer selection for this article, so let’s assume that you’ve decided which printer you want (or already have it) and move on for now.
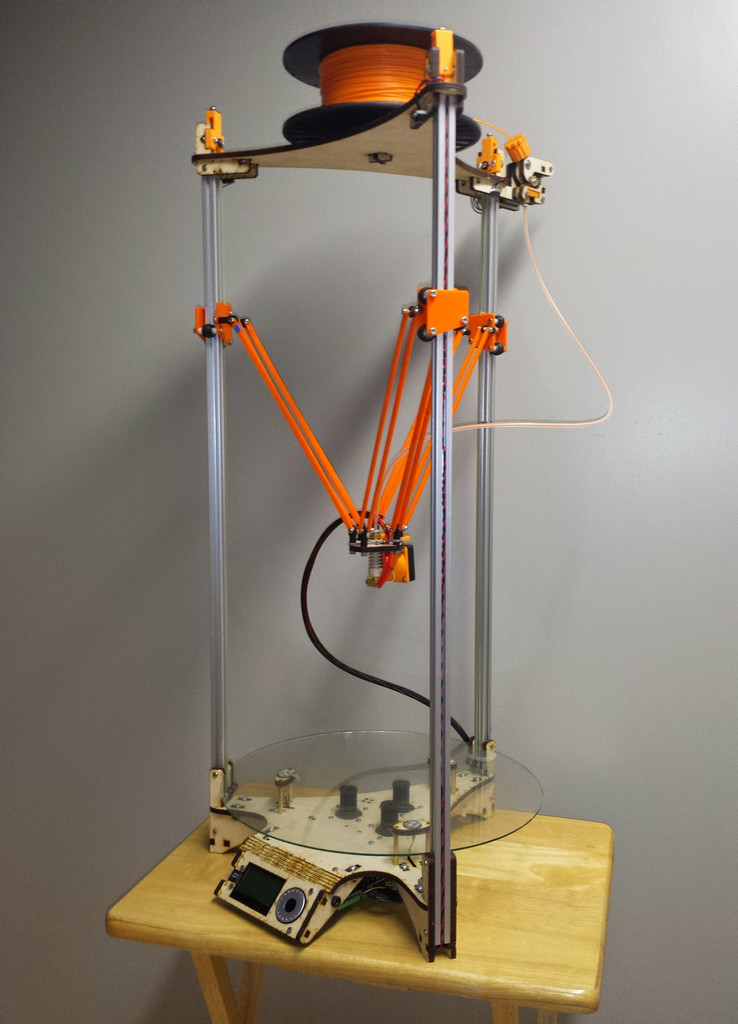
The printer that I’m using (pictured at the top of this post) is called a delta type printer because the 3-axis control (X Y Z) is accomplished with 3 sets of control arms that move the print head (commonly called a hotend). This printer uses Fused Deposition Modeling (FDM) to melt layers of plastic on top of each other to build the part. This is the most common type of hobbyist 3D printer due to the simplicity of the design, which makes it more affordable that many of the other alternatives.
2A. Create Your Own 3D Model
This is the part of the process that was my segue to the 3D printing industry. 3D modeling is a big part of my day job. Most of the 3D modeling that I do daily is on a much larger scale than what we are talking about here though. I’m usually working on designing food production plants, not small widgets.
There are two options for creating your own 3D model. You can use a 3D scanner to scan an existing object, or you can model your object from scratch using 3D modeling software. You could also do a combination of the two.
3D scanners are a new developing market that was born from the 3D printing revolution. Not everyone wants to get their hands dirty using a complicated 3D modeling application to build their creations. 3D scanners have the potential to be much faster than 3D modeling and make it much easier to capture complex geometries. I’m not going to get into the details in this post. Instead, I’ll point you to this article as a nice primer to 3D scanning technology if you’d like to learn more.
 3D modeling software is still the much more common path to creating your own custom object. There are numerous 3D modeling applications available to choose from. There are quite a few free alternatives too, so you don’t need to spend a fortune on high-end software if you are just going to be doing this as a hobby. Personally, I tested out about 3 or 4 different options before I settled on my decision. I suggest that you do the same. Each application has a little different interface and methodology for creating a 3D object. What works for one person doesn’t always work for another, so test them out. Make sure that you search on YouTube to see if there are any good tutorials as you are learning. You can pick up a lot of good tips this way!
Here are a few of the alternatives for 3D modeling software:
- Sketchup (free)
- DesignSpark Mechanical (free)
- Blender (Mesh based – free)
- Tinkercad (free on-line app)
- OpenSCAD (parametric modeling – free)
- FreeCAD (parametric modeling – free)
- Solidworks (professional)
- Autodesk Inventor (professional)
You can find a much more complete list on the RepRap site if you’d like to explore other 3D modeling software options. For anyone that’s curious, I’ve settled on DesignSpark Mechanical for my personal use right now. The interface and commands seem to work well for my 3D modeling style and they have a nice series of videos that help to explain all the tools.
2B. Download a 3D Model on-line (.STL File)
 If you are not interested in creating your own models, you can still have a lot of fun with a 3D printer. There are thousands of objects available to be downloaded on the internet with just the click of a button. Most of the models on the 3D printing sites are even available in the common .STL format. That way you won’t need to do any type of file conversion prior to the next step in the process – slicing. If you download an .STL file you will be able to load that file directly into your slicing program.
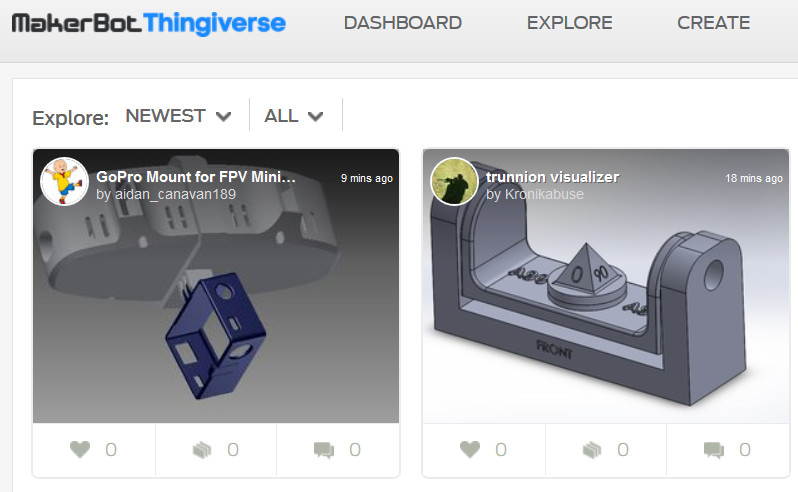
Two of the most popular 3D model repositories right now are Thingiverse and Youmagine. Check them out and do a quick search for something. You’ll be amazed at all the free content available. There is a more complete list of sites that host 3D models available on the RepRap Printable Part Sources wiki page.
3. .STL File Slicing Applications
This is the point where the true 3D printing process begins. Up to this point, we’ve only been doing some 3D modeling, or downloading some files, or maybe even assembling a box of parts into your 3D printer. You might have some experience with this type of things prior to owning a 3D printer. Most likely though, you’ve never even heard of a Slicing Application before now.
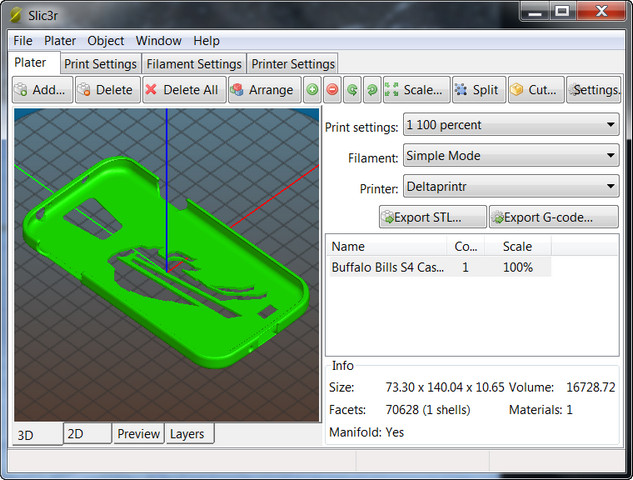 A slicing program will import your 3D model and “slice” it into very thin layers so that your 3D printer can understand how that 3D model needs to be built up layer-by-layer. For each layer, the slicing application will generate a list of coordinates that tell the print head how to move from point to point to create that slice of the model. I like to think of this as the GPS coordinates for the printer since it reminds me of the way mapping software works to plot a path between two destinations.
The slicer will also provide information to your printer to tell it things such as when to extrude plastic, when to move without extruding plastic, what temperature to heat the plastic to, how thick each layer is, etc.
Just as with the 3D modeling, there are quite a few software options available to help you with this step of the process. Here are some of the more common slicing applications that are used today:
- Cura
- Slic3r –only the beta version 1.2.6 has an interface that will visually display the slicing results
- Repetier-Host– Visual interface for slicing software of your choice
- Printrun aka Pronterface
- KISSlicer
I’d like to suggest Cura, if you are just getting started. I think that they have one of the more user-friendly interfaces of the bunch. Don’t be shy about testing others though. Everyone likes a little something different. That’s why there are so many options! Additionally, many of the 3D printer companies have developed customized slicing applications that ship with their printers. Your probably best off to try that first, if it is an option.
A number of useful software applications for slicing and other related 3D printing functions are also discussed on the 3D Printing for Beginners website.
4. Slicing Parameters
The real fun begins once you’ve installed your slicing program and imported your first 3D model. Now you’ll need to set up the slicing parameters in your program.
For most 3D printing newbies, this is the most challenging part of the process. You can certainly include me in this group. The massive amount of settings and the associated unfamiliar terminology can be overwhelming for someone who is new to this technology. Raft, brim, retraction, z hop, … What do these terms mean? Are all of these settings critical? If not, which ones are the important ones? These are all questions that popped into my head as I stared at the screen of parameters for the first time.
Let me start by saying this: “Less is more”. Don’t start by Googling terminology and adjusting parameters based on what you think makes sense. Trust me on this. I went down that path, and it’s not pretty. For most printers you will find some recommended default settings on their website. If not, look for some common settings for the material that you are testing out, and start there.
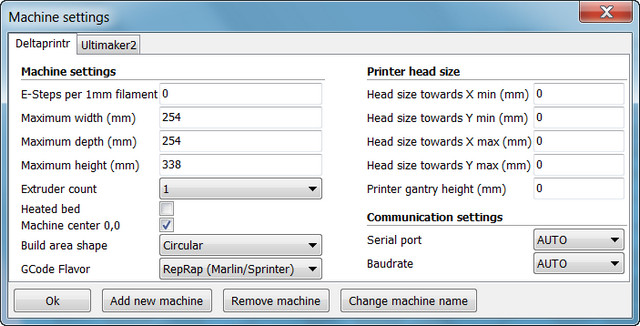
Typically, the first thing that you will need to do in any slicing program is input your “Machine Settings”. This is where you will input the type of 3D Printer that you are using, the maximum print size, and your basic extruder setup. You’ll only need to do this once for your chosen slicing application.
 Here are some of the most common slicing parameters that you might consider adjusting on your first few prints:
- Layer Height – smaller will produce a higher quality print, but take longer to print (.2 to .3 is a good starting point)
- Fill Density – 0 is an empty shell and 100% is a completely solid object (20% is usually a good starting point)
- Print Speed – slower will produce a higher quality print, but take longer to print. (20 – 30 mm/sec is a good starting point, many printers can go quite a bit faster after some tuning)
- Print Temperature – this will depend on the material that you are using (PLA ~190°C, ABS ~240°C)
- Support – enable support if your model has overhanging features that will need to be supported from layers below.
After a few test prints, you will probably notice that something might need a little adjustment. Or maybe you are trying to print an object that has some specific features that require some fine tuning of the parameters. Now is the time to make a small adjustment and try another test print to see the results. Again, don’t go crazy making numerous adjustments all at the same time or it will just add to the confusion.
RichRap has some nice guides on the basic slicing parameters and how they affect your finished product (Part 1, Part 2, Part 3). These guides are specific to the Slic3R application, but most of the concepts can be applied to the other slicing programs also.
5A. Export the G-Code to Micro SD Card
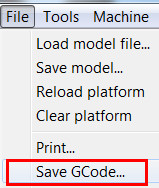 Now that you have all the slicing settings configured, it is time to export the file to a format that your printer can understand. Typically that is G-Code. For every slicing program the procedure is slightly different. Usually though it involves either a “Save As…. G-Code” command or “Export… G-Code”
What is G-Code? G-Code was originally designed for CNC machines. A 3D printer is basically just a specialized type of CNC machine, so this code works well for controlling a 3D printer. G-Code has some specialized commands for homing the printer, setting the extrusion temperature, leveling the build plate,… etc. But, most of the G-Code just contains the coordinates that tell the print head where to move to make the desired shape. It is kind of like GPS mapping coordinates for your 3D printer. If you are interested in the specifics of the commands, you can find a complete list of G Code commands on RepRap.
My 3D printer has a slot that accepts a Micro SD Card, so I typically export the G-Code directly to a Micro SD Card and then plug that card into my printer. Depending on your printer the media may be different, but the process is still the same.
5B. Print Directly Using a USB Cable
If your printer supports it, you can also consider printing directly to the printer from your slicing software. This will allow you to bypass the G-Code export, and may also give you some added features such as viewing the current printing status on your PC or laptop. However, it’s not all positives if you go this route. Many users have noted that tying your 3D printer to your PC for a lengthy print can be a bit risky. If your PC has a little hiccup while that print is running, it is very likely that you will see a problem in the print or it’s even possible that it could wreck the print completely.
Of course, the slicing software that you are using must be able to communicate with your printer via a USB cable also. This may involve installing a serial driver, or other specialized installation method depending on your 3D printer, so I’m not going to dig into the details of that here.
6. The Saga Continues…
There is plenty more to cover on the topics that I’ve touched on here, but hopefully I’ve helped you get started on the right path with your new 3D Printer. 3D Printing can be a really fun hobby, but it can also be frustrating at times. Let me know if you have any questions or suggestions for future topics that you’d like to know more about. I’m learning more every day as I experiment with my Deltaprintr and I look forward to sharing my experiences with you.
Until next time…
Very helpful, Thanks